Showing posts with label corel draw. Show all posts
Mesh fill is a powerfull tool to create realistic drawing of natural or artificial picture. The tool may seem difficult to use at first, but once we know its basic concepts, you can create realistic effects.
picture : Activate the mesh tool and set the mesh tool property
To learn how to use a mesh fill is to practice directly to the object. 

In this tutorial, we will create a simple leaf using the mesh fill tool.
Before we start, we need to understanding the basic concepts of mesh fill :
1. You must always try to make an image as simple as possible. Complex images are made with a few simple images.
2. By default, the mesh fill is applied in a vertical or horizontal direction, so it may not always have the direction that you want. You can make sure that the mesh fill matches the perspective, the shadows, the direction of the light, and other properties of the object by rotate the object before applying the mesh fill.

Let's Start..!
1. Create a leaf object. You can use the line tool and curving the line segment to shape of leaf. Color it with green.
picture 1. create simple shape of leaf


2. Rotate the object that we created earlier, so the leaf and the mesh fill matches the perspective, shadows light, and other properties.
picture 2. Rotate to matches with the perspective, shadows light, and other properties


3. Click the Interactive Mesh Tool to activating the interactive mesh tool
Change the horizontal and/or vertical mesh fill properties with the value we want. With the freehand mesh fill property selected, create curve that matches the perspective of the leaf. Curves the node of the mesh matches with the contour of the leaf.
With the nodes selected, fill it with the matches color.


picture 3. Fill color


4. We can applying to other leaf and create a sprig of leaves.
picture 4. a sprige of leaf


When making the leaves, of course not that simple when making indentation curve, but it will be even more complicated if we want a more realistic form. We need to make many parts separately. (picture 6)

picture 5. little more modification


picture 6. complex mesh fill to create more realistic


After that, we can modify it by adding drops of water drops on the surface. Drops of water drops is made also by using a mesh fill tool

Picture 7. Adding it with water drops


picture taken from : Ariel Garaza Díaz for the tutorial pictures


 Download this tutorial
or
When designing in CorelDraw, there will be many objects  created in the stage, overlapping each other objects is can't be avoided, since we use  many objects combined to create effects. So, when we are facing with the complexity, we need tools to managing all around objects. 

In CorelDraw, The Object Manager makes it much simpler managing the objects.

Picture 1.1 : Menu Bar Object Manager
 First, we need to activating the object manager. 
By default, the Object Manager  is deactivated. To activating the object manager  click  Tools in menu bar, then select Object Manager from the drop down menu. (picture 1.1 )


The Object Manager now will shown in the right docker. (picture 1.2)


picture 1.2 : Object Manager Docker


As we see, each object that we created, it will showing in the Object Manager (picture 1.2  :  object name is in red rectangle )

The difficulty  is, we need to memorize every each object name, but i think it would be easier than looking object one by one in the stage. To get more easier, we can rename it with a unique name that is easy to remember.

For Examples, see picture 1.3 below : 

picture 1.3 Example Case for Object Manager
In the Picture above, as we can see, there are four objects in the page 1. each object are shown in the Object Manager with symbol and different color depending on object color.
The depth layer is blue rectangle is at bottom layer, and red rectangle in upper layer. It means, in the Object Manager showing the depth layer of the object.
You can rename it with your own name. Just right click and then select rename from the drop down menu (see picture1.3).


Conclusion : More easier to manage many object with the Object Manager than looking object one by one under clicking.  Object Manager is a powerful tool  designing in CorelDraw.
.


Download THis Article in 

openOffice format here 
or
 pdf format here


Corel Draw is one of the powerfull vector editor and creator today. Since first time release, it become one of the standard for the vector drawing / editor / creator program. Corel Draw being the leading application in vector editor, this is proven by their seriousness in developing for functions  and supporting.
Corel Draw support almost all bitmap format to import such as *.jpg, *bmp, *.png , etc. It support for vector format such as *.eps too. In other way, we can export the object(s) to *.jpg, *.png, *.gif, *.eps, *.office file format in easy steps. Or we just want to save our project in corel draw format.


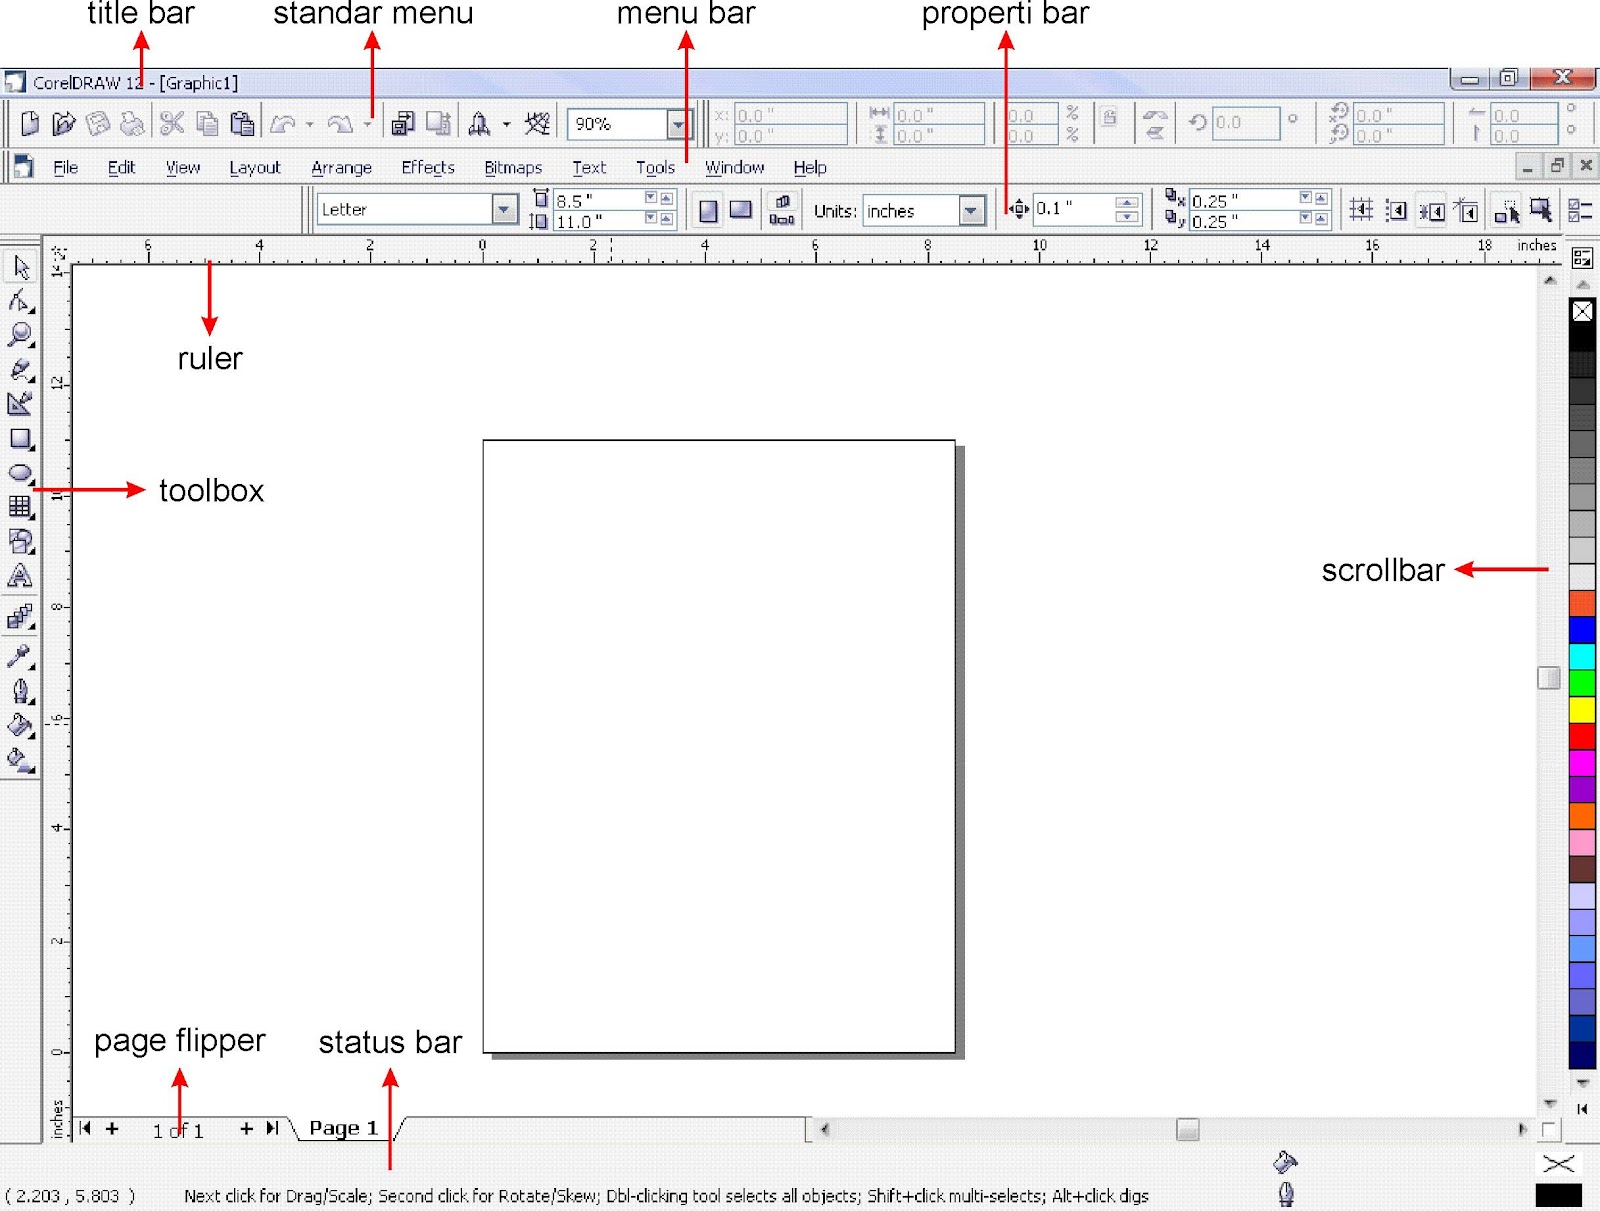
The first time when we want to learn Corel Draw is we should to know the interface, tools and function from it. It separately from the menu bar, tool bar, tool box,  properti bar, page flipper, status bar, scroll bar.
The interface can be shown in the picture 1.1 below.

picture 1.1 The Corel Draw Interface

As we can see, there are many tools in the interface in corel draw, all have own it functions.
1. Title bar is only a corel draw header which is folowing by the active corel draw file name.Usefull to give information to  us when we open more than one corel draw files.
2. Standard Menu showing menu for the corel draw standard command for fast shortcut menu, such as, open file, close file, save file,undo - redo, copy-paste-cut, view zooming, etc.
3. Menu Bar is the most  important here (in my arguments) , because, all the tools, all the operation tools, and almost all of the interface is in here. We can't showing all the  tool bar in the corel draw, it will takes hugh place the tool bar.
4. Tool box is a tool bar but in the left side, and the functions is usually to drawing object, give some modification etc.
5. Property Bar will automatic showing when we choose one of the toolbox, it showing the property of the tool to optimizing the tool it self. Property bar will give different views everytime different tool active.
6 Page flipper use for page management. We use this to add / delete the page, move forward or backward to another page, and showing the active page.
7. Status bar showing position of cursor, or the object position, or the CMYK or RGB propeties color.
8. Scroll bar use to scrolling the stage up or down, or left or right to comfortable vieweing the stage.


* download this article in open office or pdf format