When designing in CorelDraw, there will be many objects  created in the stage, overlapping each other objects is can't be avoided, since we use  many objects combined to create effects. So, when we are facing with the complexity, we need tools to managing all around objects. 

In CorelDraw, The Object Manager makes it much simpler managing the objects.

Picture 1.1 : Menu Bar Object Manager
 First, we need to activating the object manager
By default, the Object Manager  is deactivated. To activating the object manager  click  Tools in menu bar, then select Object Manager from the drop down menu. (picture 1.1 )


The Object Manager now will shown in the right docker. (picture 1.2)


picture 1.2 : Object Manager Docker


As we see, each object that we created, it will showing in the Object Manager (picture 1.2  :  object name is in red rectangle )

The difficulty  is, we need to memorize every each object name, but i think it would be easier than looking object one by one in the stage. To get more easier, we can rename it with a unique name that is easy to remember.

For Examples, see picture 1.3 below : 

picture 1.3 Example Case for Object Manager
In the Picture above, as we can see, there are four objects in the page 1. each object are shown in the Object Manager with symbol and different color depending on object color.
The depth layer is blue rectangle is at bottom layer, and red rectangle in upper layer. It means, in the Object Manager showing the depth layer of the object.
You can rename it with your own name. Just right click and then select rename from the drop down menu (see picture1.3).


Conclusion : More easier to manage many object with the Object Manager than looking object one by one under clicking.  Object Manager is a powerful tool  designing in CorelDraw.
.


Download THis Article in 

openOffice format here 
or
 pdf format here


Object Properties is a box with a variety properties for the objects.
By Default, the Object Property does not appear when we first time open the CorelDraw. It only appear if we right click the object and choose the object property. Or, we can open it from menu bar windows > dockers > object properties
The Object properties is one of the important things in COrelDraw. In here, we can found the  :

1. Fill object properties, 
 We can modify fill color the active object choosen with this.Here, we find the Fill Type popup that include : No fill, Uniform fill, Fountain fill, Pattern Fill, Postscript Fill, Texture Fill.
a. No FIll : it means we does not give any color to object(s), this means as same as 100% transparent
b. Uniform Fill : it means we give a color to the object(s), color will be spread evenly to the object(s.
c. Fountain fill : The color will be given a color gradient from the initial to the final color.
d. Pattern Fill : the object color will be given according to the pattern we choose.
e. Postscript Fill : almost the same as the fill pattern, but the color patterns using the postscript file that we load.
f. Texture Fill : almost the same as the fill pattern, but the color patterns using the bitmap like that we load.
No Fill option


Uniform Fill


Fountain Fill


Pattern Fill

Postscript Fill

Texture Fill


2. the outline fill
The Outline Fill
 The Outline Fill  is object properties to control the line of each object. It contains many style of line for modification.
Width : to change the how big thickness the line.
Color : to change the color of line
Style : use this to change the style color line.

3. general object properties,
It only show the information about the objects. Can to modify the wrap paragraph style.

General Object properties

4. detail object properties
 Detail objects properties provides information about the active selected object : selection width, selection height, selection center, and rotation center. 
Detail Properties


5. internet object properties,
it provides the internet link about the active objects selected.

6. rectangle object properties

Rectangle object properties

if you want make some modification your object with corner roundness, you can find in here. Just set the number in here, live preview  applied directly to the object.


Download this Article in pdf format here 
or openOffice format here


Level :Intermediate
compatibility : X3
tools  : Ellipse tool, transparency tool, interactive fill tool, powerclip or weld


picture : Frog inside Orb Glass: http://my-facebook-covers.blogspot.com/ logo


Create an object like the one above is not as difficult as it seems. All it takes is a few tools, precision and patience. And I'm sure, coreldraw provide comfort in the manufacturing process.

First of all, you need to import frog image, better if you have vector silhouette.
or you can download all material in this tutorial here.  Be sure you have good pixels size if you use bitmap or jpeg file.

importing the frog image


The second steps, create  a  circle objects, white fill and black line. Duplicate this circle, so you have two circles your stage, place two circle separate.
*Why you should draw two same circle? the answer is : you still have the duplicate just in case if you get wrong when editing the circle and need the same size or properties the circle.


make the circle and duplicate it

Third, create an ellipse object, smaller than the first circle so they can get in the circle. Don't forget to duplicate this ellipse just in case you get wrong when editting.

creating ellipse and duplicate it


Step fourth, let's mixing beetwen circle and frog image..!!
Position the circle and the frog image center each other. Order the circle to top of the frog image, then locate the frog image center of the circle. 
*you can select both, circle and frog image, then press the "C" then "E" on keyboard to make both center each other.

Then select with pick tool frog image, select effect from menu bar, highlight to PowerClip place inside container. when the pointer change to big black horizontal right arrow, click the circle object. done..! you likely cropping  the frog image to circle object. 

Powerclip the image to the object


Fifth step  create the shadow
Duplicate the circle again, fill it with white color and and use no line color.
Select Interactive drop shadow tool from Interactive tool : set the preset = small glow, drop shadow opacity = 88, drop shadow feathering = 13.

shadowing the circle
Then place the shadowed circle and the circle frog image center each other. Don't forget to order the shadowed circle under the circle frog image.

center each other and layer explanation
** don't forget to group before go to the next step


Now, next step is create the glossy glass effect.
Center the ellipse that we have made before with the frog image that we have made shadowed and fill the ellipse with white color, without outline (see picture below)

vertically center ellipse and frog image

With the ellipse object selected, press the interactive transparency tool (figure arrow 1) from interactive tool, set the transparency properties to linear (arrow 2) and transparency midpoint to 100 (arrow 3).
Set freely the transparency arrow point for the ellipse by dragging the transparency arrow point from top to bottom (arrow 4). See the picture below :

set the glossy glass effect

done !
Last step, group the orb glass, select it then export it to *.png, or *.jpg from file > export (with selected only checked if you  want to export orb glass only )


That's it, Done..! you've have made orb glass effect with CorelDraw. Congrat..!
Of course you can modify with your own creativity idea.
Have Fun ..!!


You can download this tutorial here for odt format, or here for pdf format


Menu Bar in Corel Draw


When we are facing with application, (it means almost all) we always see the main menu bar. Menu bar is a standard application handling for easy use and friendly interface. Almost all tools can be find in here, or in the other means tool bar is the shortcut of the menu bar.
In Corel Draw, almost all tool interface can be found in here. Menu bar contains File3, Edit, Bitmap, Arrange, View, Windows, Help
IN here we only discuss a few more important things in menu bar.


picture 2.1 Example menu bar


Here the list of Menu bar and the few of explanation :

  1. File menu
    • New : Create new blank corel draw workspace
    • New From Template : Create new corel draw workspace from template
    • Open : Open corel draw from file that we have made
    • Close : Close active corel draw workspace
    • Close All : Close all corel draw workspace
    • Save : Saving your active corel draw project.
    • Save As : Saving your active corel draw project with a new name
    • Import : Insert supported objects to the corel draw workspce except corel draw file
    • Export : Save the objects to other formats (not corel draw file format) ex. Jpg, eps, png, etc
    • Export Office : Save the objects to office formats , ussualy *.png format
    • Send To : Save the workspace to desktop, mydocument, mail.
    • Print : Print the objects in the stage to the printer. (printing)
    • Print Preview : View of the objects that will send to the printer.
    • Print Setup : Setup the media to print in the choosen printer
    • Publish To Web : Make The file for the web
    • Publish To PDF : Make the file export to pdf format
    • Recent Files : Open recent corel draw files
    • Document Info : information about the document active
    • Exit : Close and leave from corel draw application


    2. Edit menu
    • Undo : canceling the last drawing or editing commands performed
    • Redo : it means that you have restored all the operations that were previously undone.
    • Cut : Moving the objects to the other place, space or other file
    • Copy : Duplicate the objects to the clipboard
    • Paste : Placing the objects after duplicate it to the clipboard
    • Insert Barcode : insert barcode to the stage
    • Insert New Object : insert new object
    • Properties : view the properties of the object.

    b
    • Full-Screen Preview : viewing the stage / workspace in the fullscreen mode
    • Guidelines : Show the guide lines
    • Grid : Show the grid lines
    • Rulers : show the ruler

    4. Layout menu
    • Insert Page : Adding page after the active page
    • Rename Page : change the page name
    • Delete Page : Delete the page
    • Got To Page : to the page ….
    • Page Setup : Setup the stage / workspace
    • Page Background : Setup the background

    5. Arrange menu
    • Group : merge the selected objects
    • Ungroup : unmerge the selected objects
    • Ungroup All : unmerge the selected objects and the subgroup under it
    • Lock Object : make the objects can’t move and can’t to modificating
    • Unlock Object : open the object lock
    • Unlock All Object : open all the object lock


    6. Effects
    • Artistic Media : Give the effect modification to object
    • Blend : Blending effect
    • Contour : give contour effect
    • Envelope : transform object using envelope effect
    • Extrude : Extruding the object
    • Bevel : Beveling the object
    • Lens : Lens effect like

    7. Text
    • Character Formatting : Setting up the text format
    • Paragraph Formatting : setting up the paragraph
    • Tabs : Setting up the tabs
    • Columns : Setting up coloumn
    • Bulets : Setting bullets
    • Drop Cap : Setting up the drop cap
    • Edit Text : Make a change to text
    • Insert Symbol Characters : Insert the symbol character to text

    download this article here  (pdf) or here (odt)


Corel Draw is one of the powerfull vector editor and creator today. Since first time release, it become one of the standard for the vector drawing / editor / creator program. Corel Draw being the leading application in vector editor, this is proven by their seriousness in developing for functions  and supporting.
Corel Draw support almost all bitmap format to import such as *.jpg, *bmp, *.png , etc. It support for vector format such as *.eps too. In other way, we can export the object(s) to *.jpg, *.png, *.gif, *.eps, *.office file format in easy steps. Or we just want to save our project in corel draw format.


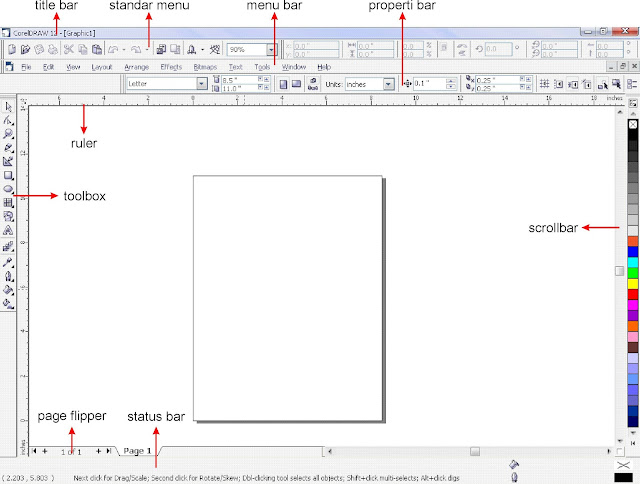
The first time when we want to learn Corel Draw is we should to know the interface, tools and function from it. It separately from the menu bar, tool bar, tool box,  properti bar, page flipper, status bar, scroll bar.
The interface can be shown in the picture 1.1 below.

picture 1.1 The Corel Draw Interface

As we can see, there are many tools in the interface in corel draw, all have own it functions.
1. Title bar is only a corel draw header which is folowing by the active corel draw file name.Usefull to give information to  us when we open more than one corel draw files.
2. Standard Menu showing menu for the corel draw standard command for fast shortcut menu, such as, open file, close file, save file,undo - redo, copy-paste-cut, view zooming, etc.
3. Menu Bar is the most  important here (in my arguments) , because, all the tools, all the operation tools, and almost all of the interface is in here. We can't showing all the  tool bar in the corel draw, it will takes hugh place the tool bar.
4. Tool box is a tool bar but in the left side, and the functions is usually to drawing object, give some modification etc.
5. Property Bar will automatic showing when we choose one of the toolbox, it showing the property of the tool to optimizing the tool it self. Property bar will give different views everytime different tool active.
6 Page flipper use for page management. We use this to add / delete the page, move forward or backward to another page, and showing the active page.
7. Status bar showing position of cursor, or the object position, or the CMYK or RGB propeties color.
8. Scroll bar use to scrolling the stage up or down, or left or right to comfortable vieweing the stage.


* download this article in open office or pdf format